The Ultimate Easy Rajma Masala (Punjabi Style)
In North India, Rajma Chawal is not just a meal; it’s a weekend tradition. There is something incredibly soul-satisfying about a plate of steaming basmati rice topped with thick, spicy kidney bean curry and a dollop of ghee.
However, many people struggle with the texture. Sometimes the Rajma is too hard, or the gravy feels like "beans floating in spicy water."
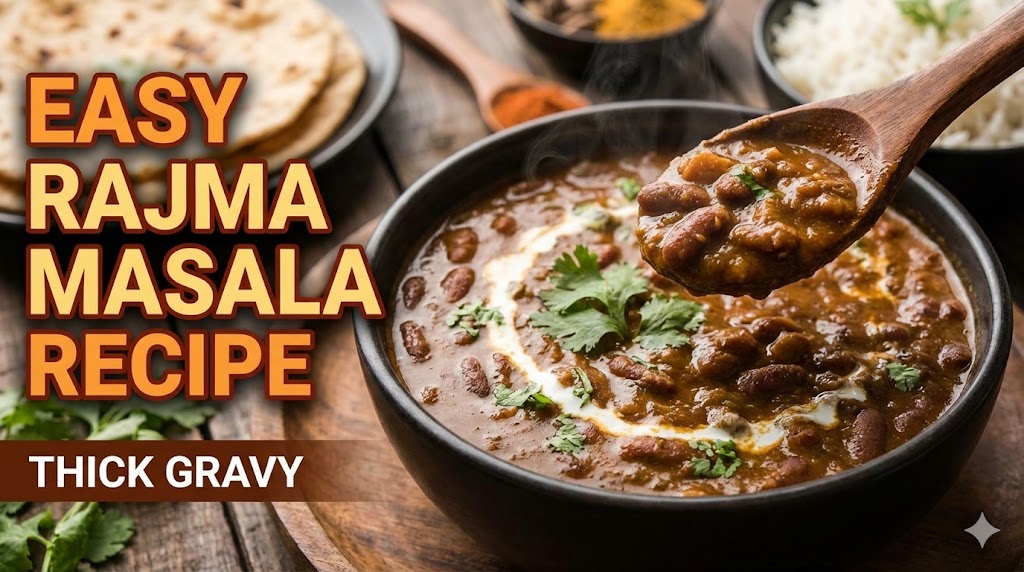
Today, I’m sharing the secret to getting that thick, creamy, restaurant-style gravy without using any cream or cashews. This recipe relies on the natural starches of the beans and a perfect Bhuna Masala.
💡 The "Secret" to Thick Gravy:
Once your Rajma is boiled and added to the masala, take a potato masher or the back of your ladle and mash about 10-15% of the beans directly into the pot. These mashed beans release starch which instantly thickens the water into a rich, coating gravy. This is the difference between an amateur and a pro!
🛒 What You’ll Need
The Beans
- Rajma (Kidney Beans): 1 cup (Chitra or Red variety).
- Water: 4 cups for boiling.
- Salt: 1 tsp.
- Whole Spices for Boiling: 1 Black Cardamom, 1-inch Cinnamon stick.
The Masala Base
- Onions: 2 large (Finely chopped).
- Tomatoes: 3 medium (Pureed for smoothness).
- Ginger-Garlic Paste: 1.5 tbsp.
- Green Chilies: 2 (Slit).
- Oil/Ghee: 3 tbsp.
The Spice Blends
- Cumin Seeds (Jeera): 1 tsp.
- Turmeric Powder: ½ tsp.
- Red Chili Powder: 1 tsp (Kashmiri for color).
- Coriander Powder: 1.5 tsp.
- Rajma Masala / Garam Masala: 1 tsp.
- Kasuri Methi: 1 tsp (Dried fenugreek).
- Amchur (Dry Mango Powder): ½ tsp (For that signature tang).
👩🍳 Step-by-Step Cooking Guide
Step 1: The Overnight Soak
Wash the Rajma thoroughly. Soak it in 4 cups of water for at least 8 to 10 hours. Kidney beans are tough; if you don't soak them properly, they will never get that "melt-in-the-mouth" texture.
Step 2: Pressure Cooking
Drain the soaking water. Add fresh water, salt, black cardamom, and cinnamon to a pressure cooker along with the beans.
Cook for 6-8 whistles on medium heat. The beans should be so soft that they mash easily between two fingers. Do not throw away the boiling water (the stock)!
Step 3: Creating the Flavor Base
Heat oil or ghee in a heavy pot. Add cumin seeds and let them splutter.
Add the finely chopped onions. Sauté on medium flame for 8-10 minutes until they turn deep golden brown. (The darker the onions, the richer the color of your Rajma).
Step 4: The Masala Roast
Add ginger-garlic paste and green chilies. Sauté for a minute.
Add the tomato puree along with turmeric, red chili powder, and coriander powder. Cook this masala until the oil starts separating from the sides. This is the Bhuna stage—essential for a rich taste.
Step 5: The Marriage of Beans & Masala
Add the boiled Rajma (along with the water it was boiled in) to the pot.
Apply the Pro-Secret: Mash a small portion of the beans with your ladle. Mix everything together.
Step 6: The Simmer
Add Rajma Masala, Amchur, and Kasuri Methi. Cover the pot and let it simmer on low heat for 12-15 minutes. This slow simmering allows the beans to absorb the spices.
Step 7: The Garnish
Finish with a generous amount of freshly chopped coriander and a teaspoon of butter on top for that restaurant-style shine.
🍽 The Perfect Serving Suggestion
Rajma Masala is best enjoyed with:
- Jeera Rice: The classic "Rajma Chawal" combo.
- Lacha Paratha: For a more indulgent meal.
- Side Salad: Sliced onions, a squeeze of lemon, and a pinch of chaat masala.
Top Tips for Success
- Don't use cold water: If you need to add more water during simmering, always use hot water. Cold water shocks the beans and stops the cooking process.
- Tomato Quality: Use ripe, red tomatoes. If your tomatoes are very sour, skip the Amchur powder.
- The Next Day Taste: Rajma actually tastes even better the next day as the flavors intensify over time!
There’s no love like Rajma Love. Enjoy your meal! 🍛